Knowledge base

Compressor 4.1.1 release notes

Posted in Apple Portable Computers

Compressor version 4.1.1 is an update to Compressor 4. This update is recommended for all Compressor 4 users.

Compressor 4.1.1

What's new in Compressor 4.1.1:

  • Resolves issues with installing Compressor on a computer where Qmaster was previously enabled
  • Improves the reliability Send to Compressor from Final Cut Pro X
  • Addresses distributed encoding errors when source files are not on the startup volume
  • Fixes errors that could cause a hang when submitting a batch
  • Fixes a stability issue that could occur if multiple Compressor plug-ins are installed
  • Resolves an issue when viewing a plug-in setting without the plug-in installed
  • Includes general stability improvements


Compressor 4.1

This update adds the following features:

  • New interface with a single-window layout and streamlined controls
  • Preset Destinations for common encoding tasks
  • Simplified setup for distributed encoding
  • Hardware-based H.264 encoding in supported Share operations
  • Support for Dolby Digital Plus encoding
  • Share directly to YouTube at 4K resolution
  • Share directly to Chinese video sites Youku and Tudou

Compressor 4.0.7

This update improves overall stability, performance, and compatibility. Updates include:

  • Removes 1 GB file size limit for uploads to Vimeo
  • Fixes a stability issue when playing back certain MPEG-2 files
  • Fixes a stability issue in Qmaster when processing multiple jobs

Compressor 4.0.6

This update improves overall stability and performance including, to fix an issue with uploading clips larger than 1 GB to Vimeo.

Compressor 4.0.5

This update improves overall stability and performance including:
  • Improved cluster setup eliminates the need to have Compressor open on all cluster nodes
  • Ability to use encoding clusters without administrator authentication
  • Addresses an issue related to third-party QuickTime components that could prevent Compressor from opening
     

Compressor 4.0.4

Compressor version 4.0.4 improves overall stability and performance including:

  • Enhancements to Share Monitor for MacBook Pro (Retina, Mid 2012)
  • Resolves a stability issue that could occur when selecting the Publish to YouTube job action from the Inspector

Compressor 4.0.3

Compressor 4.0.3 adds functionality and improves overall performance including:

  • Ability to run Compressor on a Mac without a monitor
  • Fixes an issue with exporting when logged in as an Open Directory user
  • Improves performance when encoding MP4 and AVI files
  • Adds an export setting for 1080p video on compatible iOS devices

Compressor 4.0.2

Compressor version 4.0.2 improves overall stability and performance including:

  • Markers are set as chapter markers by default
  • Adds Uncompressed 8-bit and 10-bit 4:2:2 to export settings list
  • Improves the speed of transcoding from Uncompressed 10-bit 4:2:2 to ProRes

Compressor 4.0.1

Improves overall stability and performance including:

  • Updates the bitrates in Cellular settings for HTTP Live Streaming
  • Fixes an issue with accessing QuickTime Export Component settings in Final Cut Pro X
  • Fixes an issue in which This Computer cluster does not appear when OS X is configured in Chinese
  • Resolves stability issues when launching Soundtrack Pro after Compressor 4 is installed
Important: Information about products not manufactured by Apple is provided for information purposes only and does not constitute Apple’s recommendation or endorsement. Please contact the vendor for additional information.
Last Modified: Feb 11, 2014
Helpful?
Yes
No
One Moment Please
Thanks for your feedback.
Email this article
Print this page
  • Last Modified: Feb 11, 2014
  • Article: HT4590
  • Views:

    86986
  • Rating:
    • 59.0

    (574 Responses)

Change the country of your iTunes Store, App Store, iBooks Store, and Mac App Store account

Posted in Apple Portable Computers

When you make a purchase from the iTunes Store, App Store, iBooks Store, or Mac App Store, you must use the store that matches the country where you live.

If you move to a new country, you can change the country of your existing account on your iPhone, iPad, iPod touch or Mac or PC. After you change the country of your account, you won't see the items you purchased from the previous country’s store in the Purchased section.

Change your country on iPhone, iPad, or iPod touch

  1. Tap iTunes Store, App Store, or iBooks Store.
  2. At the bottom of the Featured page, tap Sign In.
    If you're already signed in, skip to step 5.
  3. Tap Use Existing Apple ID.
  4. Enter your Apple ID and password and tap OK.
  5. Tap your Apple ID.
  6. Tap View Apple ID or View Account.
  7. Tap Country/Region.
  8. Tap Change Country or Region.
  9. Tap the Store menu and tap your country.
  10. Tap Next.
  11. Review the Terms and Conditions and Apple Privacy Policy.
  12. Tap Agree if you agree to the terms and conditions.
  13. In the prompt that appears, tap Agree.
  14. Select a payment method and enter your payment information.
  15. Enter your billing address and tap Next.

Change your country on Mac or PC

  1. Click to open your account in iTunes (you may need to sign in with your Apple ID).
    Or you can follow these steps to view your account:
    1. Open iTunes and click iTunes Store.
    2. Click Sign In and enter your Apple ID.
      click sign in
    3. Click your Apple ID and select Account.
      click your Apple ID
  2. Click Change Country or Region.
  3. Select your country from the Select a country or region menu and click Change.
  4. Click Continue on the Welcome to the iTunes Store page.
  5. Review the Terms and Conditions and Apple Privacy Policy.
  6. Select “I have read and agree to these terms and conditions” if you agree.
  7. Click Agree.
  8. Enter your payment method.
  9. Enter your billing address and click Continue.

Get help

See what to do if you can't change your country or region.

Important: Information about products not manufactured by Apple is provided for information purposes only and does not constitute Apple’s recommendation or endorsement. Please contact the vendor for additional information.
Last Modified: Feb 10, 2014
Helpful?
Yes
No
One Moment Please
Thanks for your feedback.
Email this article
Print this page
  • Last Modified: Feb 10, 2014
  • Article: HT6119
  • Views:

    1

    Additional Product Support Information

    iTunes Store charges on credit and debit card statements

    Posted in Apple Portable Computers

    This information may be useful if you see unfamiliar iTunes Store charges on your credit or debit card statement.

    The credit or debit card statement you receive for your iTunes Store account can show any of these types of charges:

    • iTunes Store, App Store, iBooks Store, or Mac App Store purchases
    • Renewals of subscriptions, such as iTunes Match, or a recurring subscription to magazines, newspapers, or TV shows
    • In-app purchases for additional content made within apps that you downloaded from the App Store or Mac App Store
    • iCloud additional storage or annual renewals
    • Purchases made by a significant other, a child in your household, a relative, or co-worker with access to your iTunes Store account (Apple ID)
    • Another iTunes Store Account (Apple ID) in your household that may be linked to the same credit or debit account
    • Allowances you've set up
    • Charges for pre-ordered content that's now available
    • Bank authorizations: Some institutions may show authorizations as charges or pending charges
    • Charges from multiple purchases may be grouped together as one transaction

    Contact Apple Support for any of the following reasons:

    • You've reviewed your purchase history, and you're sure the charges aren't related to one of the above scenarios
    • You have charges on your statement, and you don't have an iTunes Store account

    Learn more about:

    Last Modified: Feb 7, 2014
    Helpful?
    Yes
    No
    One Moment Please
    Thanks for your feedback.
    Email this article
    Print this page
    • Last Modified: Feb 7, 2014
    • Article: HT6006
    • Views:

      0

      Additional Product Support Information

      iTunes 11.1.4 for Windows: Unable to install or open

      Posted in Apple Portable Computers

      Follow these steps to resolve the issue:

      Check for .dll files

      1. Go to C:\Program Files (x86)\iTunes and C:\Program Files\iTunes and look for .dll files.
      2. If you find QTMovie.DLL, or any other .dll files, move them to the desktop.
      3. Reboot your computer.
        Note: Depending on your operating system, you may only have one of the listed paths. 

      Uninstall and reinstall iTunes

      1. Uninstall iTunes and all of its related components.
      2. Reboot your computer. If you can't uninstall a piece of Apple software, try using the Microsoft Program Install and Uninstall Utility.
      3. Re-download and reinstall iTunes 11.1.4.

      Read Full Article

      Resetting an AirPort base station FAQ

      Posted in Apple Portable Computers

      This article answers frequently asked questions about resetting AirPort base stations including AirPort Express, AirPort Extreme, and AirPort Time Capsule.

      This article answers frequently asked questions about resetting your AirPort base station. It includes the steps to reset your specific device.

      Collapse All | Expand All

      What is a reset?

      A reset is the first step in a process that restores your AirPort base station to a state that will allow you to gain control of it when you have either lost the password or when the device is not responding as expected. Depending on the type or reset needed, you will either need to push a reset button on the device or complete the reset from the AirPort Utility application.

      AirPort base stations with 802.11b and 802.11g support soft and factory default resets, while AirPort base stations with 802.11n and 802.11ac support soft, hard, and factory default resets.

      Depending on the situation, you will need to choose one of the following reset types:

      • Soft reset: Resets the device password and disables security for five minutes so that you can join the network to make changes.
      • Hard reset: Resets the base station back to an unconfigured state, but retains the last saved configuration and any profiles so you can restore your base station from previous settings.
      • Factory default reset: The same as a hard reset but also removes any saved configurations or profiles.

      Under what circumstances will I need to do a reset?

      • Soft reset: Perform this reset if you have forgotten your password.  A soft reset resets your password and disables security settings (Access Control and RADIUS settings are temporarily interrupted). Forgetting the password would normally prevent you from connecting to or configuring the device. If you make no changes within five minutes of doing a soft reset, the device will revert back to its former state. All of the device's settings will be available after it has restarted.
      • Hard reset: Perform this reset for troubleshooting and resolving problems with an unresponsive device, or to troubleshoot network accessibility issues.
      • Default Settings reset: Perform this reset if you wish to repurpose the device and want to remove all personal profiles and settings first. This reset resets the device to its state when you first purchased it. Data stored on internal or external hard drives connected to the device will not be erased. If you choose, you may manually erase the hard drive using AirPort Utility. 

      What default settings will my AirPort base station have after a hard or factory default reset?

      • AirPort base stations are set to request an IP address by DHCP.
      • AirPort base station passwords are "public."
      • AirPort base station names revert to "base station xxxxxx," where xxxxxx is the last six digits of the wireless MAC address*.
      • AirPort base station network names are "Apple Network xxxxxx," where xxxxxx is the last six digits of the wireless MAC address*.
      *A MAC (Media Access Control) address, also known as a "network ID," is a unique hardware identification number for a network port.  You can find the wireless and Ethernet network IDs on the printed label on the bottom or side of the device.

      What important information should I know before performing a reset?

      • The device will remain in soft reset mode for five minutes. If you do not make your changes within five minutes of pressing the reset button, you will need to reset it again.
      • When troubleshooting, you should only use hard or factory default resets if all other methods of accessing the device fail or if you want to repurpose the device.
      • If your device stops responding completely, you can reset the device. A hard or factory default reset may be useful when troubleshooting a problem, because it will restore the device to its default state, allowing you to reconfigure it.
      • In the case of AirPort Graphite or AirPort Snow (Dual Ethernet) base stations, your computer should be directly connected to the device using an Ethernet cable, as you will need it to be able to configure the wireless connection.

      How long does a reset take?

      A soft reset is instant. As soon as you hit the reset button, the device in soft reset mode.

      After a hard or factory default reset, the device will not be visible in the AirPort menu item or AirPort Utility for a short time. The device will take approximately 45 seconds to become available again. You may then use the device in its default state or reconfigure it using AirPort Utility.

      Should I use AirPort Admin Utility or AirPort Utility?

      • The latest version of AirPort Utility should be used for 802.11n and 802.11ac base stations. The latest version of AirPort Utility can be found on the Support Downloads page.
      • For AirPort Graphite and AirPort Snow (Dual Ethernet) base stations, use AirPort Admin Utility for Graphite and Snow 4.2.5.

      Where is the reset button on my specific AirPort base station?

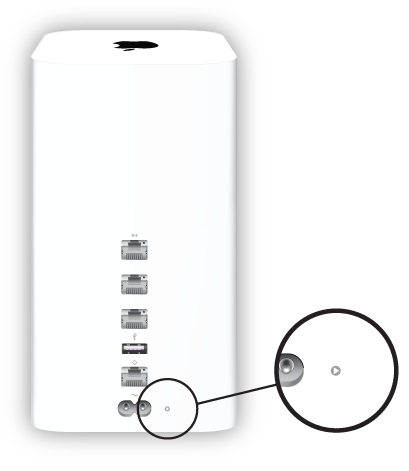
      Here's a close-up view of the reset button icon:  


      AirPort Extreme and AirPort Time Capsule 802.11ac  - The reset button is to the right of the AC Power Inlet:

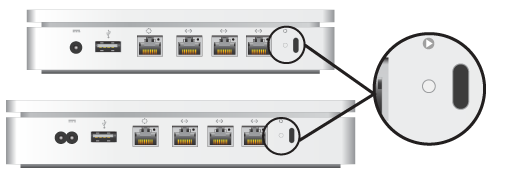
      AirPort Extreme 802.11n (top) and AirPort Time Capsule (bottom) - The reset button is to the right of the last LAN port:

      reset button on back of extreme or AirPort Time Capsule

      AirPort Express 802.11n (2nd Generation) - The reset button is located near the audio port:

      AirPort Express 802.11n (1st Generation) - The reset button is located near the audio port:

      reset button on back of airport express

      Extreme base station (802.11b/g) - The reset button is to the left of the Ethernet WAN port:

      reset button on back of extreme base station

      Snow (Dual Ethernet) (802.11b) - The reset button is to the right of the ethernet LAN port:

      reset button on back of snow base station

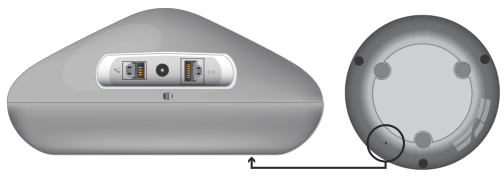
      Graphite (802.11b) - The reset button is located underneath the device:

      reset button on back of graphite base station


      How do I reset my AirPort base station?

      Choose your device and the type of reset you wish to complete below to see the appropriate reset steps.

      AirPort Express, AirPort Extreme, and AirPort Time Capsule (802.11n/ac)

      Soft reset

      1. Connect the device to power and wait for it to complete its start up process. To learn more about the start up process, please see All about Wi-Fi base station Status Lights (LED).
      2. Press and hold the reset button with a pen, pencil, or straightened paperclip for 1 full second, then release it. The light (LED) will begin flashing amber, indicating that the device is in soft reset mode.
      3. From the AirPort menu bar item, choose the network created by the device (the network name does not change).
      4. Open AirPort Utility from Applications > Utilities.
      5. Select the base station, then click Edit (The Edit window will indicate that the base station is in Soft Reset mode).
      6. Move through the tabs to make changes to your passwords or other settings as needed, and click Update and Continue as required
      7. Quit AirPort Utility.

      Hard reset

      1. Press and hold the reset button with a pen, pencil, or straightened paperclip until you see the status light (LED) start to flash amber rapidly, which should occur after about five seconds.
      2. Release the button and the device will reset.
      3. Wait about a minute for the base station to finish restarting, then open AirPort Utility from Applications > Utilities.
      4. Select the base station from Other Wi-Fi Devices, then click Edit.
      5. Select the Other Options button.
      6. Select "Restore previous settings" and click Next until you get to the final window.
      7. AirPort Utility will indicate that Setup is complete. Click Done.
      8. Quit AirPort Utility.

      Factory Default reset (using reset button)

      If the device isn't accessible from AirPort Utility, the Factory Default reset can be accomplished by using the reset button.

      1. Press and hold the reset button with a pen, pencil, or straightened paperclip until you see the status light (LED) start to flash amber rapidly, which should occur after about five seconds.

      Important: Factory Default reset doesn't erase the contents of any hard drives associated with the base station.

      Extreme base station (802.11b/g)

      Soft reset

      1. Open AirPort Utility in Applications > Utilities.
      2. Select AirPort Utility > Check for Updates...
      3. Install the most recent firmware and version of AirPort Utility available for your Mac.
      4. Connect the base station to power.
      5. Push and hold the reset button with a pen, pencil, or straightened paperclip for ten seconds.
      6. Release the button. The base station will soft reset.

      Hard reset

      No hard reset option is available for Extreme base station (802.11b/g).  Use a factory default reset instead.

      Factory default reset

      1. Disconnect the base station from its power source.
      2. Press and hold the reset button with a pen, pencil, or straightened paperclip, then plug the base station back in while continuing to hold the button for approximately 5 seconds until you see the three status lights glow.
      3. Release the button. The base station will factory default reset.

      Graphite (802.11b) and Snow (Dual Ethernet) base station (802.11b)

      Soft reset for Mac OS X v10.5 or earlier

      1. Connect the base station to power.
      2. Insert a pen, pencil, or straightened paperclip through the hole where the reset button is located and press and hold it for one full second.
      3. The middle LED will blink once every second while the device is in soft reset mode.
      4. The base station password is set to "public" and the IP address is reset.
      5. Use AirPort Admin Utility for Graphite and Snow 4.2.5 to reconfigure the base station.
        Note: The location of this utility varies with different operating system versions. You can locate it using Sherlock prior to Mac OS X 10.2, or the Find dialog of the Finder in Mac OS X v10.2 or later.

      You can connect to the soft reset base station using the following manual network settings on your computer:

      • IP Address 192.42.249.15
      • Subnet 255.255.255.0
      • Router 192.42.249.13
      1. From the AirPort menu bar item, choose the network created by the base station (the network name does not change).
      2. Open AirPort Admin Utility for Graphite and Snow.
      3. Select the base station and click Configure. This allows you to make the following changes:
        • IP address: Unless you have been given an IP address by your Internet service provider or system administrator, do not change the IP address.
        • Reset the base station password.
        • Turn encryption on to activate password protection for your AirPort network. If you turn on encryption, enter a new password for your AirPort network.
      4. Make changes to passwords or any other settings you require, then click Update. The base station will use the new settings after it has restarted. 

      Hard reset

      No hard reset option is available for Graphite and Snow base stations.  Use a factory default reset instead.

      Factory default reset for Mac OS X v10.5 or earlier

      1. Connect your computer to the AirPort base station using Ethernet. You can connect directly to the base station using an Ethernet crossover cable, or you can connect through an Ethernet switch using standard Ethernet cables.
      2. Configure your Mac's TCP settings to connect using Ethernet, and configure manually (IP 192.42.249.15, Subnet 255.255.255.0, Router 192.42.249.13).
        You may notice a brief system delay after closing the control panel.
      3. Disconnect the power adapter from the base station and then reconnect it.
      4. When all three status lights light up, insert a pen, pencil, or straightened paperclip into the reset button hole on the bottom of the base station.
      5. Press and hold the reset button for 30 seconds until the middle AirPort base station status light turns on. In the case of the Graphite base station, if the middle light glows green, you pressed the reset button too late. Go back to step 3 and try again.
      6. Open AirPort Admin Utility for Graphite and Snow 4.2.5.
        Note: The location of this utility varies with different operating system versions. You can locate it using Sherlock prior to Mac OS X 10.2, or the Find dialog of the Finder in Mac OS X 10.2 or later.
        Note: AirPort Admin Utility for Graphite and Snow 4.2.5 does not currently work with Mac OS X 10.6 or later.
      7. After a brief delay, a list of base stations appears. If the AirPort Admin Utility for Graphite and Snow is already open, click the Re-scan button.
      8. Select your base station from the list and click Configure (The base station name will be set to the Ethernet ID of the base station, for example "00-50-E4-5B-8F-EA").
      9. Follow the onscreen instructions to reinstall your AirPort base station software.
        Note: The AirPort base station password is set to "public."
      10. Use AirPort Admin Utility for Graphite and Snow to reconfigure the base station.

      Verifying a factory default reset
      Check the base station's name. If the name is the same as the user defined it, then the device went into a soft reset instead of a factory default reset. A Graphite base station in factory default mode will only show up if the computer is connected to it with an ethernet cable. It will not reappear on the wireless network until it has been reconfigured and restarted.

      Important: After you complete the AirPort base station reset and wireless reconfiguration using AirPort Admin Utility, remove the Ethernet cable from the computer. Then, select the new wireless network from your computer's network settings.

      Last Modified: Jan 31, 2014
      Helpful?
      Yes
      No
      One Moment Please
      Thanks for your feedback.
      Email this article
      Print this page
      • Last Modified: Jan 31, 2014
      • Article: HT3728
      • Views:

        4961291
      • Rating:
        • 60.0

        (8908 Responses)

      Additional Product Support Information

      Using Keynote Remote

      Posted in Apple Portable Computers

      With Keynote Remote you can control your Keynote presentation from your compatible iOS device.

      Keynote Remote is included in Keynote 2.1 and later on iOS. Using Keynote Remote requires an iOS playback device with Keynote 2.1 or later or a Mac playback device with Keynote 6.1 or later. If you're using the earlier Keynote Remote standalone app, see Using the Keynote Remote App.

      Expand All | Collapse All


      Linking Keynote Remote to your Mac

      Keynote Remote needs to be linked to your Mac in order to control your Keynote presentation from your iOS device.

      1. On your iOS device, tap Settings > Wi-Fi to verify it's on the same wireless network as your computer. For help connecting to Wi-Fi on your device, see iOS: Troubleshooting Wi-Fi networks and connections.
      2. On your Mac, open your presentation in Keynote.
      3. Choose Preferences from the Keynote menu and select Remotes.
      4. Place a checkmark next to Enable.
      5. On your iOS device, open the Keynote app and tap the Keynote Remote icon in the toolbar of the presentation manager. If you're in a presentation, tap Presentations in the toolbar to open the presentation manager.
      6. If this is the first attempt to link to this Keynote Remote, tap Continue. If this is not the first link to this Keynote Remote, tap the Devices button, and then tap "Add a Device."
      7. On your Mac, click the Link button next to the name of your iOS device. It should appear in the Remotes menu you had open.
      8. Confirm that the four digit passcode that appears on your Mac also appears on your iOS device. If the passcode matches, click Confirm.

      You can now control the slideshow on your computer from your iOS device by tapping Play on the iOS device. For instructions on using Keynote Remote once you have it linked, see the Using Keynote Remote section below. 

      Linking Keynote Remote to another iOS device

      If you have a presentation in Keynote for iOS, you can control your presentation from another iOS device.

      1. On both iOS devices, tap Settings > Wi-Fi to verify both iOS devices are on the same wireless network.

        For help connecting to Wi-Fi on your device, see iOS: Troubleshooting Wi-Fi networks and connections. If a Wi-Fi connection is unavailable, on both devices go to Settings > Bluetooth and turn Bluetooth on. See the Using Keynote Remote with Bluetooth section below for more information.

      2. Open your Keynote presentation on the device you'll use for the presentation.
      3. Tap the Tools icon in the toolbar.
      4. Tap Presentation Tools.
      5. Tap Allow Remote Control.
      6. Turn on Enable Remotes.
      7. On the device you will use as the remote, open the Keynote app and tap the Keynote Remote icon in the toolbar of the presentation manager. If you're in a presentation, tap Presentations in the toolbar to open the presentation manager.
      8. If this is the first attempt to link to this Keynote Remote, tap Continue. If not, tap the Devices button, and then tap "Add a Device."
      9. On the device displaying the presentation, tap Link next to the name of the device that will control the presentation. The device name should appear in the Allow Remote Control menu that you had open.
      10. Confirm that the four digit passcode that appears on the presentation device also appears on the controlling device. If the passcode matches, tap Confirm.
      11. Tap Done on the presentation device to return to the presentation.

      You can now control the slideshow on the presentation device by tapping Play on the controlling device. For instructions on using Keynote Remote once you have it linked, see the Using Keynote Remote section below. 

      Using Keynote Remote 

      Once you've linked Keynote Remote to your computer or iOS device, follow these steps to control your slideshow with it.

      1. If it's not already open, open your Keynote presentation on your Mac or presentation device.
      2. On the Keynote Remote device, tap the Keynote Remote icon in the presentation manager toolbar. If you're in a presentation, tap Presentations in the toolbar to open the presentation manager. 
      3. It may take a few seconds for your remote device to connect to your computer. Once it has, your remote device will display the Play button.
      4. Tap Play.
      5. Your slideshow will appear on your remote device. Swipe in either direction to move to the next or previous slide.
      6. For more layout options, tap the Layout icon on your remote device to view these options:
        • Current: Shows the build/slide on your remote device that is being presented.
        • Next: Shows the build/slide on your remote device that will appear next in the presentation.
        • Current and Next: Shows both the current and next build/slide side by side.
        • Current and Notes: Shows the current build/slide and the notes for that slide side by side.
      7. To end the slideshow, tap the X icon or swipe down with two fingers.

      Using Keynote Remote with Bluetooth

      When a Wi-Fi connection is unavailable, you can use Keynote Remote with Bluetooth to control your Keynote slideshow from one iOS device to another (but not to a Mac). Slides may take longer to appear on Keynote Remote when connected via Bluetooth.

      Additional Information

      • You can use a Mac to create a computer-to-computer network as an alternative to using a local wireless network.
      • Before playing your slideshow, you may want to disable incoming phone calls if you're using Keynote or Keynote Remote on an iPhone.
      • You can also use AirPlay to play your presentation from Keynote on your iOS device to an Apple TV. Learn more about using AirPlay.
      Last Modified: Jan 31, 2014
      Helpful?
      Yes
      No
      One Moment Please
      Thanks for your feedback.
      Email this article
      Print this page
      • Last Modified: Jan 31, 2014
      • Article: HT6112
      • Views:

        0

        Additional Product Support Information

        China Mobile: Frequently asked questions

        Posted in Apple Portable Computers

        Are iPhone 5s and iPhone 5c models for China Mobile new versions? And are there any new features?

        These iPhone 5s and iPhone 5c models offer all the same great customer features. Due to regulatory and carrier requirements, the models for China Mobile were certified for their 4G or TD-LTE and 3G or TD-SCDMA networks. For 4G access, you need a new 4G nano-SIM (also called a 4G nano-USIM) and should check with China Mobile about your data plan.

        China Mobile models:

        • iPhone 5s (Model A1518)
        • iPhone 5c (Model A1516)

        Apple Retail, Apple Online Store, and other resellers will sell unlocked versions for China Mobile:

        • iPhone 5s (Model A1530)
        • iPhone 5c (Model A1529)

        If I purchased an unlocked iPhone 5s or iPhone 5c in China before the China Mobile launch on January 17th, will my iPhone work on China Mobile's 3G or 4G network?

        Only certain iPhone models will work on the China Mobile network. To see if your iPhone is compatible, please check its model number, which is on the back of your iPhone, under the word "iPhone".

        Due to regulatory and carrier requirements, model numbers A1528 and A1526 aren't certified for use on China Mobile's 3G and 4G networks but may connect to their 2G network. An iPhone with model number A1533 or A1532 isn't compatible with China Mobile.

        Only an iPhone with model number A1518, A1516, A1530, or A1529 is certified to support TD-SCDMA and TD-LTE in China.

        If you purchased your iPhone 5s or iPhone 5c from an Apple Retail Store or the Apple Online Store, you may be able to exchange or return your iPhone for one that is compatible with China Mobile's if you are within 14 days of your purchase date. If your iPhone model was purchased elsewhere, please refer to the seller's return policy.

        Will the iPhone I bought overseas work on China Mobile?

        Your unlocked iPhone 5s (Model A1530) or iPhone 5c (Model A1529) that you purchased overseas, such as in Hong Kong, can access China Mobile's 2G network. These models can also access China Mobile's 3G and 4G networks with a carrier settings update. If you haven't received the settings update, go to Settings > General > About and follow the prompts. For 4G access, you need a new 4G nano-SIM (also called a 4G nano-USIM) and should check with China Mobile about your data plan.

        How can I see if the carrier bundle is installed?

        Tap Settings > General > About. If the bundle is installed, Carrier will appear as follows: iPhone 5s and iPhone 5c: China Mobile 15.7 or later.

        Can I buy the unlocked China Mobile models and use them on China Unicom or China Telecom?

        Unlocked models A1518 and A1516 purchased from China Mobile can support China Unicom's 2G network only. Unlocked models from China Mobile don't support China Telecom's CDMA-based network.

        Unlocked models A1530 and A1529 purchased in China through Apple Retail, Apple Online Store, or other resellers can support China Unicom's 2G and 3G networks. These models don't support China Telecom's network.

        For more details, see the technical specifications for iPhone 5s and iPhone 5c.

        When traveling overseas, which networks can my China Mobile iPhone access?

        • When a compatible overseas SIM card is inserted, all China Mobile models can access 2G, 3G, and 4G LTE networks on supported carriers. If roaming agreements exist, models with a China Mobile SIM can also roam on 2G, 3G, or 4G LTE networks.
          See the iPhone supported carriers and which carriers support LTE.
        • Models A1518 and A1516 can access 3G WCDMA only while traveling with an overseas SIM or through roaming agreements with other carriers.
        • Models A1530 and A1529 can access 3G WCDMA on China Unicom's network in China.

        Which features does China Mobile support?

        Please see the supported carriers and features.

        Read Full Article

        Logic Pro X 10.0.5 key command presets

        Posted in Apple Portable Computers

        These presets were updated as a result of changes to the keyboard shortcuts used by OS X Mavericks. Logic Pro X 10.0.5 also corrects several key commands in Logic Pro X 10.0.4.

        Command Name Logic Pro X
        10.0.5
        Logic Pro X
        10.0.4
        Logic Pro X
        10.0.3 and earlier
        Show Tool Menu T ⌥1 T
        Hide/Show List Editors D T D
        Deselect All ⇧⌥ D D ⇧⌥ D
        Zoom Window ⇧⌥⌘M ⌥⌘M ⌥⌘M
        Play from Left Window Edge ⇧⌤ ⇧⌴ ⇧⌤
        Play from Selection ⇧⌴ ⇧⌤   ⇧⌴

        To activate a preset, choose Logic Pro X > Key Commands > Presets, then select a language from the list.

        Read Full Article

        Aperture 3: RAW photos edited by Sony camera software may appear distorted

        Posted in Apple Portable Computers

        If you edit a RAW photo using the desktop software provided with a Sony camera, the camera software may remove the lens-distortion data needed for lens correction. Photos without this data may appear distorted in Aperture.

        To make sure that your imported RAW photos contain lens-correction data, don't edit them using the Sony software. Import them into Aperture first.

        Read Full Article